Article Text

Abstract
Proficient colonoscopy technique that optimises patient comfort while simultaneously enhancing the timely detection of pathology and subsequent therapy is an aspirational and achievable goal for every endoscopist. This article aims to provide strategies to improve colonoscopy quality for both endoscopists and patients.
- colonoscopy technique
Statistics from Altmetric.com
Introduction
Caecal intubation and adenoma detection rates (ADRs) are benchmarks of colonoscopy quality.1 However, the passage to-and-from these ‘benchmark’ destinations is equally important. A proficient colonoscopy technique that optimises patient comfort while enhancing pathology detection and subsequent therapy is an aspirational and achievable goal. With our ageing population, there is a burgeoning need for efficient diagnostic colonoscopy in screening and symptomatic cohorts within limited resources. While new colonic polyp surveillance guidelines are designed to reduce the burden of repeat colonoscopies by extending the surveillance interval where appropriate,2 this emphasises the importance of a high-quality index colonoscopy to minimise the risk of missed pathology and ultimately lower the incidence of post-colonoscopy cancers.3 In this article, we outline our approach to diagnostic ileocolonoscopy with the aim of providing strategies to improve endoscopy quality for patients and providers alike.
Pre-endoscopy and non-technical considerations
Patient factors
A successful colonoscopy begins before the patient enters the endoscopy suite. It is important to be clear of the indication for the procedure and not persist if it is inappropriate. A clear indication enables the endoscopist to adequately answer the question posed by the referring clinician. Knowledge of medical history, previous endoscopies and abdominal surgery may inform the choice of sedative,4 equipment and insertion technique. While beyond the scope of this article, it should be noted that complications of endoscopy increase with age and comorbidities. Due consideration should be given to alternative investigations such as CT colonography if clinically appropriate
Equipment factors
Endoscope
The choice of endoscope can impact the comfort and success of colonoscopy. Paediatric colonoscopes are often favoured as their smaller diameter (10 to 11 mm vs a 13 mm adult colonoscope) offers greater flexibility, which can be useful for fixed and tightly angulated colons in the setting of postsurgical adhesions, hysterectomy or diverticular disease.5 6 However, increased manoeuvrability can cause excessive loops that may hinder progress and create unstable endoscope positions. Larger more rigid adult colonoscopes can counteract loop formation in patients with long redundant colons. High-definition adult colonoscopes are also favoured where optical characterisation of lesions is key for example in inflammatory bowel disease surveillance.
Endoscopic accessories
We recommend a washing foot-pump through a dedicated flushing channel or the working channel of the endoscope. This increases efficiency of clearing luminal debris and water-assisted colonoscopy, described below.
Distal scope attachments are useful adjuncts. Transparent straight cap distal attachments maintain a small space between the colonic wall and the endoscope which prevents ‘red out’, stabilises the tip and aids navigation beyond angulations and folds.5 Cuff devices with flexible arms that flatten mucosal folds can increase scope-tip stability, reduce insertion times7 and increase ADRs.8 These devices are contraindicated in active colitis or known severe diverticular disease.
Ergonomics
It is important that the endoscopist looks after their own health while delivering a safe procedure for the patient. Endoscopy involves repetitive motions and suboptimal technique, poor patient and equipment positioning can lead to chronic musculoskeletal injuries.9
The video-monitor should be directly in front of the endoscopist and height adjustable, ideally 20 cm lower than the endoscopist’s height to allow a neutral neck position and avoid truncal twisting. The bed should be approximately waist height to allow the shoulders to be relaxed, and head, spine and pelvis in-line.10 Hold the scope shaft between the fingertips and thumb to reduce exaggerated wrist flexion and extension, and hold the wheel controls in the left hand with the wrist in a neutral supinated position. Remember that rotation of the scope handle with the left arm using the elbow as a pivot across the body can assist torque manoeuvres of the right hand.
The endoscopy safety checklist
Once pertinent case information has been gathered, equipment and room prepared, the preprocedural checklist forms a core and routine part of our endoscopy.11 This is a simple but powerful tool for reducing common errors that can lead to significant patient harm (figure 1). It is important that the entire endoscopy team is involved in the checklist as this is an important opportunity for sharing clinical information that is relevant to the patient.

Endoscopy safety checklist, from Matharoo et al. Implementation of an endoscopy safety checklist, Frontline Gastroenterology 2014.11 IV,intravenous; O2 sats, oxygen saturation.
Anatomical considerations
Understanding colonic anatomy guides endoscopic intubation and extubation. The sigmoid colon arises anteriorly from the rectum in a clockwise spiral configuration. It then continues posteriorly to the descending colon along the paracolic gutter and goes anteriorly via the splenic flexure to the transverse colon. The transverse colon dips as it passes horizontally and rises to the hepatic flexure before moving down the ascending colon towards the caecum which is medially located.
The spiral concept is important in every phase of colonoscopy and not only explains loop formation, but provides answers for loop reduction.12 The colon is kept in place by mesentery attached to the posterior abdominal wall. Stretching this mesentery is responsible for abdominal discomfort. This mesentery is usually shorter in younger people and females and more mobile with increasing age and obesity. Surgery, diverticula or gynaecological pathology can affect mesenteric mobility, particularly in the rectosigmoid region. Colonic configuration is variable hence ‘reading’ the direction of the colon in conjunction with scope image-guidance is helpful.
Tips on scope handling
Six major principals of colonoscopy have remained constant regardless of intubation technique or advancements in scope technology:12
Keep the colonoscope ‘straight’ and neutral to achieve one-to-one movement with regular loop reduction.
Torque steer the shaft with the right hand.
Position change and abdominal pressure to reduce looping and optimise views.
Minimise gas insufflation if utilised on insertion.
Avoid blindly pushing unless the direction of the tip is clearly known; mucosal blanching indicates excessive force on the colonic wall.
Keep the left thumb on the up/down wheel to maximise tip control.
Small, precise and smoothly controlled movements of the wheels and shaft are better than rapid changes in direction. Often the solution to a problem during endoscopy can be found when endoscope movement is slowed, with opportunistic progression rather than repeated overcorrection. If loops form externally in the endoscope this can impede progress by increasing tension. This can be corrected by transferring the loop to the umbilicus to ensure the scope position is neutral and relaxed. This requires a degree of situational awareness to systematically examine and address factors hindering progression.
When washing or aspirating, it is recommended to rotate the suction/working channel in-line with the fluid pool (ie, at 5 or 6 o’clock for most colonoscopes). This maintains the view and avoids creating bubbles with insufflation.
Torque steering
Scope direction is mainly determined by shaft rotation (torque). This combined with tip deflection using control wheels allows steering. The up/down wheel has the greatest range of motion and is predominantly utilised for direction change: tip-up plus clockwise torque or tip-down plus anti-clockwise torque steers towards the right; and tip-down with clockwise torque or tip-up with anti-clockwise torque steers left. Combined clockwise and anti-clockwise movements helps to return the scope to neutral and avoid excessive external loops. The right/left wheel is used for finer tip steering movements laterally and can be manipulated using the left middle finger.
Variable stiffness
Variable stiffness colonoscopes have manual control of shaft flexibility to allow navigation through tight angulations, with increased rigidity to diminish looping. This feature has been shown to reduce intubation times and increase patient comfort.13 The greatest benefit of applying maximum stiffness is during recurrent looping once the sigmoid has been traversed and is straight. Once mid-transverse is reached there is generally little benefit in maintaining stiffness.14 Avoid applying the stiffener if a loop has formed. This may place extra tension on the colonic wall which can increase patient discomfort and perforation risk.
Insertion
We commence insertion in the left-lateral position which allows a formal digital rectal examination (DRE). DRE should be performed in all cases to assess if there is any anal discomfort or narrowing, to lubricate the anal canal and to assess for low rectal lesions which can easily be missed. After endoscope insertion, the rectum is distended with gas and carefully inspected in forward view and retroflexion.1 Performing retroflexion at commencement when sedation, if utilised, is at its deepest can be beneficial for patient comfort and help plan the endoscopic strategy. The rectum is fully insufflated and the scope gently manipulated into a U-turn using both the up/down and lateral wheels. Retroflexion should not be attempted if there is active inflammation, reduced rectal capacity and halted if resistance or pain is encountered to avoid perforation.
Water-assisted colonoscopy or gas insufflation
Following rectal examination, water-assisted insertion is advantageous if the bowel preparation permits. Water-assisted colonoscopy (WAC) involves the complete suctioning of luminal gas and replacement with water. Water exchange is performed if there is luminal residue. The gravitational effect of water can reduce angulation particularly at the rectosigmoid and sigmoid-descending junction and shortens colon when compared with gas insufflation (figure 2). Benefits include reduced loop formation,15 a reduced need to change position on insertion and increased patient comfort.16 17 Exchanging water on insertion also improves views and reduces the need to clean on withdrawal. Use of warm water approximating body temperature can reduce the risk of hypothermia.5 WAC can be performed during the entire insertion or limited to the left colon.
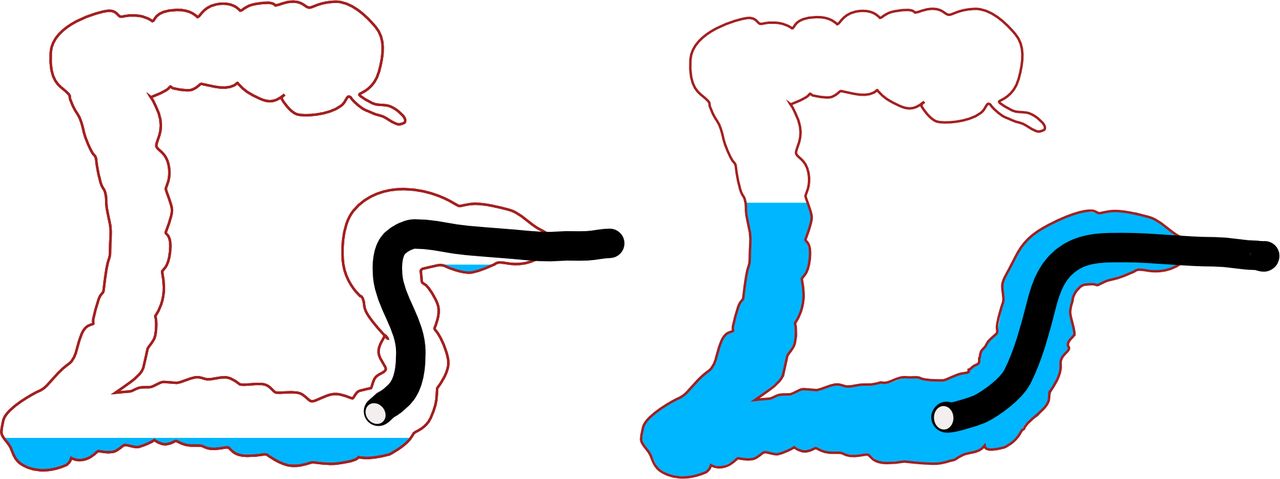
Gas insufflation versus water-assisted colonoscopy.
When gas insufflation is utilised, it is important to avoid over-insufflation as this can lengthen the colon and cause discomfort. Judicious suction can shorten the colon. Carbon dioxide insufflation is well established as superior to air in colonoscopy as it results in less distension and pain post-procedure.18
Intubation technique
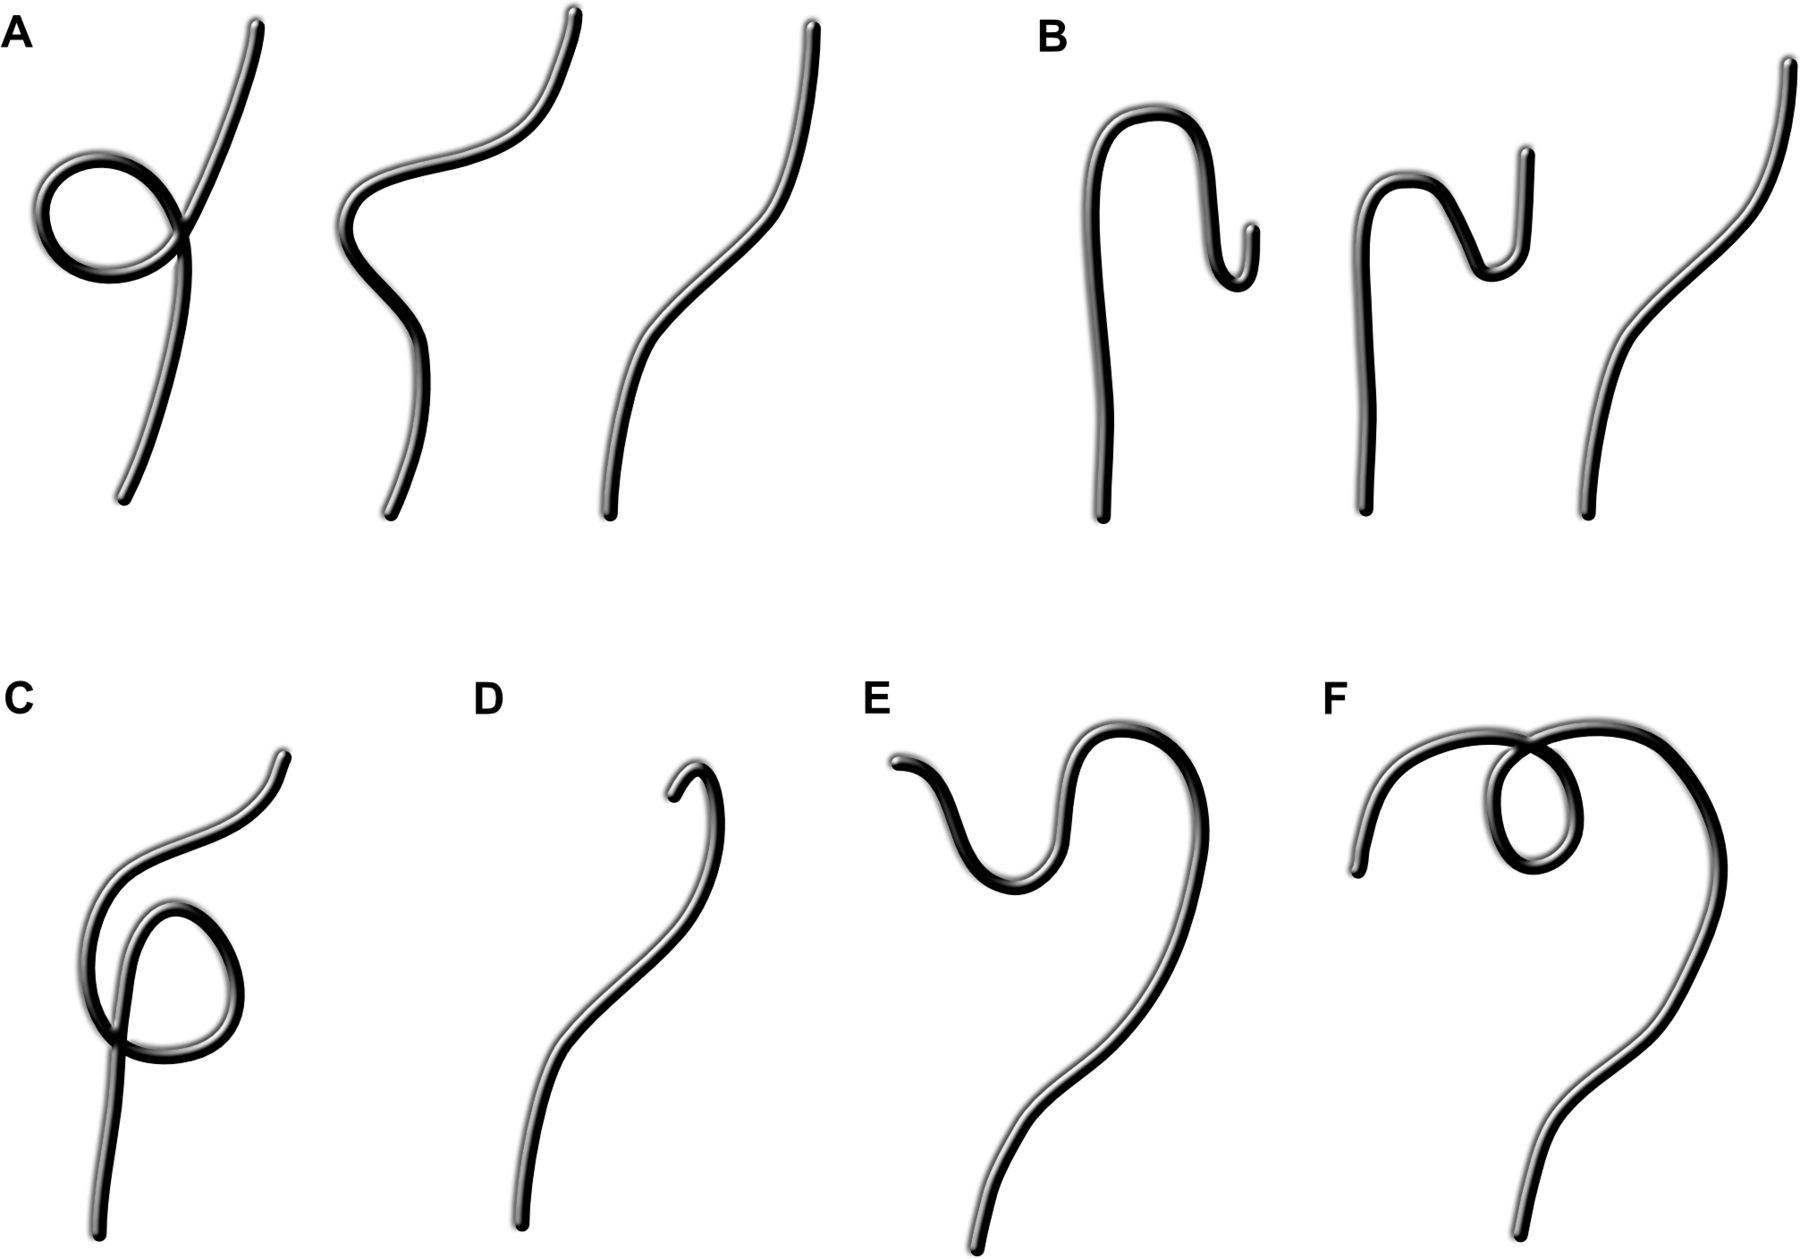
Torque steering with slalom movements right and left can help pass through the rectal folds. As the scope traverses the rectosigmoid junction with clockwise rotation of the shaft, further inward motion may result in an alpha loop (figure 3A) or ‘N’ loop (figure 3B) as the mesentery stretches. To mitigate this, slow withdrawal with clockwise torque can straighten this segment, with subsequent progression towards the descending colon.

Loops in colonoscopy. (A) Sigmoid alpha loop and resolution with clockwise torque; (B) Sigmoid N loop and resolution with gradual withdrawal and clockwise torque; (C) Reverse alpha loop; (D) Splenic flexure ‘hockey stick’; (E) Transverse loop; (F) Transverse gamma loop.
At the splenic flexure, the scope can be anchored across the fold and straightened by slight withdrawal to remove loops. The scope is then re-inserted with clockwise torque to avoid re-forming sigmoid loops and to cross the splenic flexure. Anti-clockwise torque can then be applied during insertion to prevent gamma loop formation and suction can concertina the transverse colon. Anti-clockwise torque promotes crossing the hepatic flexure by propelling the scope into the ascending colon by reducing the transverse colon loop.
Caecal intubation should be confirmed by identifying the ileocaecal valve (ICV) and appendiceal orifice or tri-radiate folds (the latter are least reliable). Terminal ileal intubation should be attempted in almost all cases. The appendiceal orifice can appear curvilinear (‘bow’ shaped), diverticuloid or umbilicated. An ‘arrow’ visualised at the apex of the ‘bow’ points towards the ileal orifice. Orienting the ileum at 6 or 9 o’clock is generally the most neutral position for the endoscope. With the tip of the scope in the caecal pole, aspirate gas to collapse the caecum and reduce tension on the ICV. Slowly withdraw the scope and move the tip towards the ileum. As the ICV approaches, often a corrective forward manoeuvre with the shaft and tip-up is required to engage the ileum when the valve is seen to open. Water or gas insufflation at the point of entry can assist tip engagement into the valve.
Photo-documentation of key landmarks (rectal retroflexion, appendiceal orifice, caecum and ileocaecal valve, terminal ileum and anastomosis (if applicable)) should be taken in all cases and is a key UK performance indicator (figure 4).1 Photos should be of good quality and in focus.

Colonic landmarks. (A) Rectal retroflexion; (B) Appendiceal orifice; (C) Ileocaecal valve with caecum; (D) Terminal ileum.
Dynamic position change
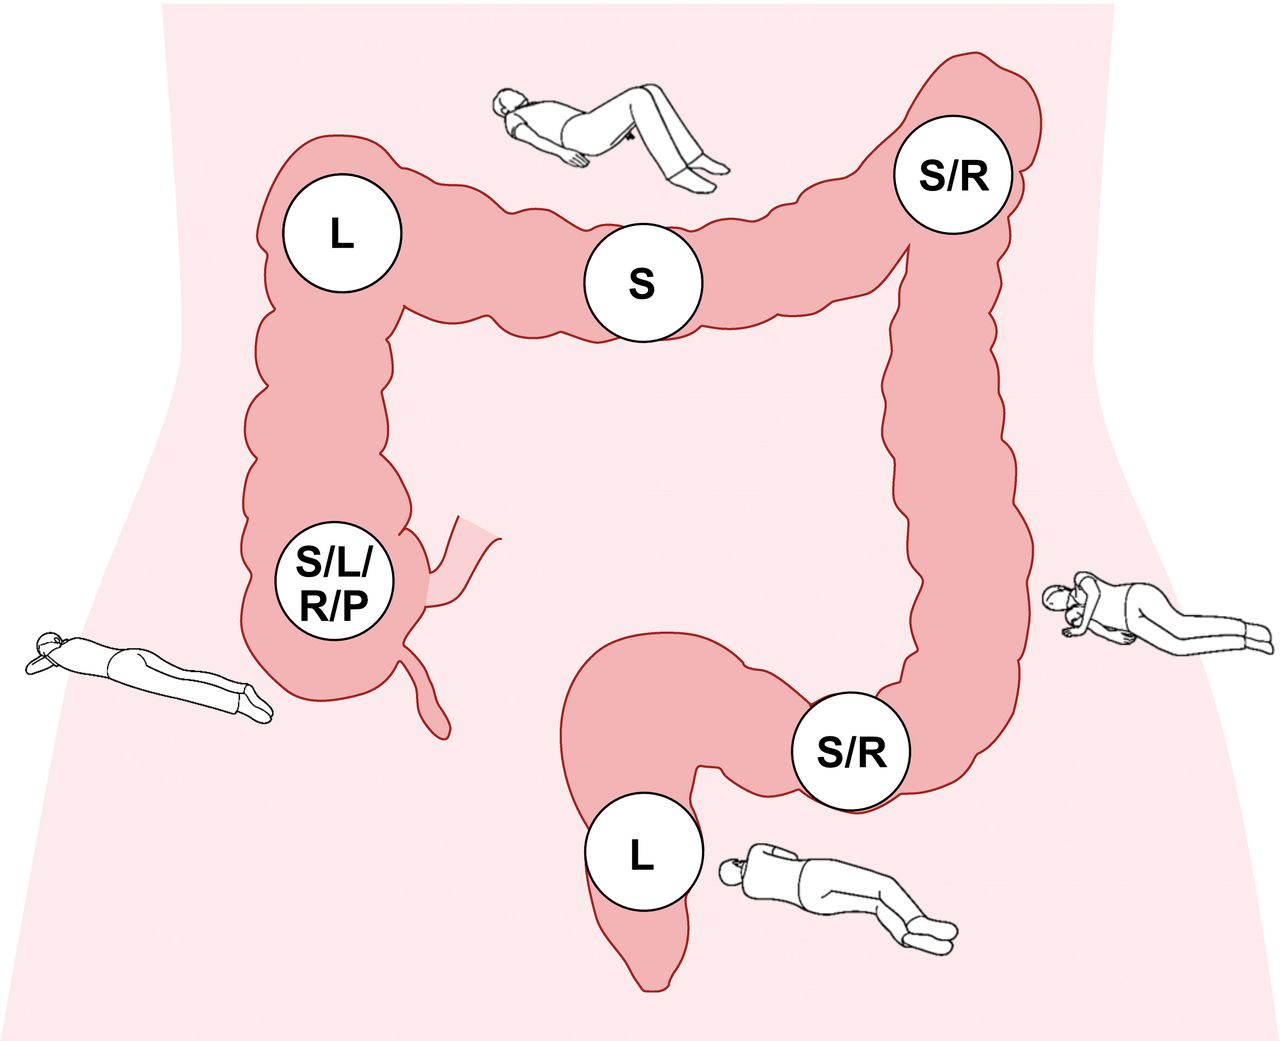
Gravity is a powerful tool in the endoscopists’ armamentarium. We favour the use of position change proactively if a patient can move/be moved freely. These manoeuvres aim to optimise the configuration of the colonic anatomy to either ‘open’ a segment or control loops (figure 5). While the left-lateral position is convenient to commence colonoscopy, the rectosigmoid and sigmoid-descending junction can collapse and become acutely angulated particularly when gas insufflation is used. A change to supine or right-lateral early in the procedure can open up these junctions as well as the splenic flexure.

Position change for colonoscopy insertion and withdrawal. L, left lateral; P, prone; R, right lateral; S, supine.
The transverse colon can be navigated in supine or left-lateral position and the hepatic flexure is generally most accessible in the left-lateral position, however caecal intubation is often best achieved in right-lateral. In patients with long mesenteries or protuberant abdomens who have anterior sigmoid loops, mobile splenic flexures and deep transverse dips, prone positioning can help control looping to achieve caecal intubation.
Abdominal pressure
Direct abdominal pressure can help control colonic loops (figure 6). The location of pressure should be determined in a logical fashion through an understanding of colonic anatomy in conjunction with image-guidance (coronal/sagittal views) to localise loops. In most instances the loop should be removed before applying pressure. If an anterior sigmoid loop is encountered, pressure over the umbilicus directed towards the left lower quadrant can suppress this (figure 6A). Left upper quadrant pressure can help with splenic flexure loops (figure 6B) and a transverse ‘lift’ can support the transverse colon if a loop is encountered (figure 6C) to help prevent it enlarging and allow scope progression. Targeted pressure should be applied in short bursts of time to pass through colonic segments to avoid discomfort to the patient and fatigue in the assistant applying pressure. In utilising additional techniques, consider pain neutral measures first that is, position change, followed by targeted abdominal pressure and scope stiffener.

Hand pressure during colonoscopy. (A) Sigmoid stabilisation for anterior sigmoid loops; (B) Left upper quadrant pressure for splenic flexure looping; (C) Transverse lift for deep transverse dips.
Common challenges on intubation
Difficulties in colonic intubation invariably come from looping of the endoscope (figure 3), tight angulations or colonic fixation.
Sigmoid colon
Looping is common in the sigmoid with alpha and N loops (figure 3A/B) most frequently encountered (described above). These are reduced with gradual scope withdrawal and clockwise torque. Occasionally, a reverse sigmoid alpha loop occurs (figure 3C) which requires withdrawal with anti-clockwise torque to reduce.
Splenic flexure
A mobile mesentery can result in a ‘hockey stick’ formation at the splenic flexure (figure 3D) whereby further insertion of the colonoscope results in greater angulation. This is common when the patient is left-lateral, and the flexure can be ‘opened’ by supine or right-lateral position. If this flexure is mobile, left upper quadrant hand pressure or intra-abdominal pressure can be applied by asking the patient to take a deep inspiration and breath-hold for a few seconds as the scope is advanced.
Transverse colon
A large inferior loop can form in long transverse colons (figure 3E). Measures to counteract this include suctioning excess fluid or gas to shorten the colon, supine positioning, deep inspiration or abdominal pressure with a transverse lift.
A transverse gamma loop (figure 3F) can form due to a very mobile colon and long mesentery. This is difficult to reduce and can make caecal/ileal intubation challenging. Strong anti-clockwise torque while crossing the splenic flexure/early transverse colon or prone position can help prevent this from occurring. Long loops are often well tolerated by the patient but make an unstable platform for further tip steering and targeted therapy.
While the goal is to ensure complete colonic examination in every patient, it should be recognised that this is not always possible even in expert hands. Always consider the patient’s comfort and safety first and identify potential barriers to completion. Please respect the patient’s wishes if consent is withdrawn intra-procedurally. For diagnostic purposes, a CT colonography may be warranted to complete the examination. If direct mucosal visualisation is required, consider referring to more experienced colleagues or expert centres or repeating the procedure with deep sedation.
Extubation
Mucosal inspection and assessment of colonic pathology is best performed during extubation. While we have high-definition imaging and devices to improve colonic views, there is no substitute for a careful and unhurried examination. A 6 to 10 min withdrawal time (in negative procedures) is recommended to optimise ADR, however the quality of how that time is spent is paramount.19 Residual colonic debris should be washed, suctioned and replaced with gas. The scope should be withdrawn steadily, with smooth rotational movements and the luminal view maintained at all times.
Dynamic position change for extubation is a cost neutral strategy to take advantage of colonic anatomy (figure 5). Rotating the patient so that the examined colonic segment is superior allows gas to rise and distend that portion of bowel. This improves views and reduces the amount of gas required for insufflation.20 Gas can be aspirated for patient comfort once a segment of bowel has been examined. Most importantly, position change has been demonstrated to improve ADR.21
Take care when passing flexures and folds. Common blind spots for missed lesions are the caecum between the appendiceal orifice and ICV, the flexures and rectosigmoid junction. A double examination of these areas is recommended. Caecal retroflexion can also improve views, however it should be performed with caution and is not routinely recommended. Tips to achieve optimal caecal views include fully insufflating the caecum, use of an anti-spasmodic and position change (often to right lateral). Use of distal attachments may facilitate good views without the need for position change and retroflexion.
Lesion assessment
If a lesion is encountered, characterise it thoroughly, even if it is not to be resected and referred onwards. Wash the lesion thoroughly without causing trauma and optimise positioning (generally, in line with working channel). The SMSA (size/morphology/site/access) score is a useful systematic way of describing a lesion.22
A biopsy forcep may help provide a size estimate (2 mm width for a closed jumbo biopsy forcep and 7 mm when jaws are open). Topographic morphology is addressed with the Paris classification,23 vascular pattern with image enhancement24 25 and pit pattern with, for example, the Kudo classification system.26 Corroborate the lesion site with image-guidance and measure the distance with a straight scope if not near a clear landmark. Make a note of procedural difficulties and the optimal patient position. Such descriptions are invaluable when planning interventional therapy. Moreover, if the lesion is unlikely to be malignant, avoid biopsy to prevent submucosal fibrosis and only tattoo if the lesion is difficult to locate or may need surgical resection. If utilised, place the tattoo opposite and at least two to three colonic folds or 5 cm away from the lesion, as tattoo infiltration can cause submucosal fibrosis and difficulties with resection.
Post-endoscopy considerations
Once colonoscopy is completed, accurately document endoscopic findings. It is helpful to comment on the equipment used, ease or difficulty of insertion, patient tolerance and features of the exam that may help future procedures. This communication may influence sedation and equipment choices for therapeutic procedures or ongoing surveillance.
Conclusion
The art of colonoscopy requires patience and a logical approach to problem-solving that can be achieved with practice. It is important for the endoscopist to avoid ‘tunnel vision’ during the procedure and maintain situational awareness for patient safety and consideration of supporting staff. Endoscopic technique can be optimised to improve patient comfort, safety and reduce the risk of missed pathology.
Acknowledgments
The authors would like to acknowledge Stephen Preston for graphical assistance and Dr Noriko Suzuki for providing endoscopic images. We would also like to acknowledge the Wolfson Unit Consultant Endoscopists, Nurse Endoscopists and Endoscopy Fellows for their collective knowledge and technical tips that have contributed to this article.
References
Footnotes
Twitter @DrMattChoy, @SiwanTG
Contributors MCC: Manuscript planning, drafting and figure creation. MM: Manuscript drafting. ST-G: Manuscript planning, editing, review, responsible for overall content.
Funding MCC is supported by a Gandel Philanthropy and a Gastroenterological Society of Australia Olympus grant.
Competing interests None declared.
Patient consent for publication Not required.
Provenance and peer review Not commissioned; externally peer reviewed.
Linked Articles
- UpFront